Incoming Inspection Procedures of Raw Materials of Tubing and Casing Tube
Incoming Inspection Procedures of Raw Materials of Tubing and Casing Tube
Incoming inspection procedures of raw materials of tubing and casing tube accords with the ninth edition of API Spec 5CT. It can be applicable to the tubing, casing tube, as well as the coupling blank.
Method
1. The warehouse keeper should inspect the following items.
1.1 He should check the quality certificate.
1.1.2 The content of quality certificate should include the furnace batch number, steel grade, contract number, the chemical composition, mechanical properties test data, specifications, quantity, geometric dimension, diameter test data, the tube testing conclusions and some others.
Requirements for Chemical Composition
Group | Steel Grade | Type | Phosphorus Max. | Sulfur Max. |
1 | J55 | - | 0.030 | 0.030 |
K55 | - | 0.030 | 0.030 | |
N80 | 1 | 0.030 | 0.030 | |
N80 | Q | 0.030 | 0.030 |
Comparison of Mechanical Properties
Group | Steel Grade | Type | Total Elongation Rate Under Load, % | Yield Strength MPa | Tensile Strength MPa Min. | |
Min. | Max. | |||||
1 | J55 | - | 0.5 | 379 | 552 | 517 |
K55 | - | 0.5 | 379 | 552 | 655 | |
N80 | 1 | 0.5 | 552 | 758 | 689 | |
N80 | Q | 0.5 | 552 | 758 | 689 | |
Requirements for Impact Toughness
Pipe Body
Firstly, three samples should be taken from the same part of a product pipe. The average value of these three impact specimen must be bigger than the required value. Only a value is allowed to below the required value, but it must not be smaller than two thirds of the specified value. There is no mandatory requirement for the steel grade of J55, K55 or N80. The maximum specified wall thickness of P110 can be found out in Table C19 and C20.
Coupling (Full Size)
From the same part of a pipe product, three samples should be taken. The average value of three impact specimen is greater than the specified requirement. We only allow a value to be less than the required value, but this value can not be less than two thirds of the specified value. Both J55 and K55 full-size samples demand for the minimum horizontal Cv of 20J, and the minimum vertical Cv of 27J. The steel grade of N80 and P110 can be looked up in Table C16. The decreasing coefficients of absorbed energy for both 3/4 size and 1/2 size samples are respectively 0.80 and 0.55.
1.1.4 When the mechanical properties and the chemical composition are in doubt, a test should be made in accordance with the batch sampling.
1.2 Quantity Check
The batch material should be weighed by the weigh bridge and checked according to the weight recorded in the quality certificate. It must be carried out in line with the metering management system of the company.
2. After confirmation, the relevant items in the raw material incoming inspection record must be filled out. Then, the record should be sent to the quality inspector on duty.
3. The quality inspector should examine the following items, and the test results need to be written in the record. Then, the record is delivered to the quality inspection department.
3.1 Diameter Measurement
A vernier caliper and other measuring tools should be used to measure the pipe with its outer diameter of no less than 10%. Its tolerance is listed as follows.
a. The pipe with the outer diameter of less than
b. For the pipe with the outer diameter of no less than
c. The tolerance of outer diameter of tubing coupling material is ±1.0%.
d. In Group 1, 2 and 3, the tolerance of outer diameter of casing tube material is ±1.0%, but it can not exceed ±
e. In Group 4, the tolerance of outer diameter of casing tube material is ±1.0%, but it is larger than
Notes
The first group contains the casing tube with such steel grades as H, J, K and N. The L steel grade casing tube is in the second group. The P steel grade casing tube is in the third group. The fourth group contains the Q steel grade casing tube.
3.2 Wall Thickness Test
An ultrasonic thickness gauge is used for no less than 10% of spot check. The tolerance should be smaller than 12.5% of wall thickness. If there is any doubt, the wall thickness inspection should subject to the measuring result of the mechanical caliper.
3.3 Appearance Inspection of the Pipe Body
The inspection is carried out by means of visual observation and the depth gauge. The inspection content contains linear imperfection, surface recesses, both internal and external surface peeling, burr and some others. The defect depth should not exceed 12.5% of wall thickness. During the appearance inspection process, the intensity of illumination must be no less than 500lx.
3.4 Straightness Test
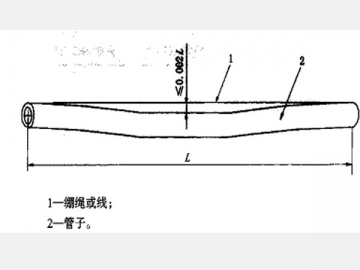
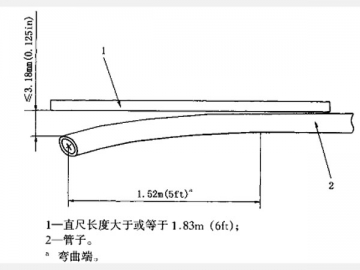
All tubes and coupling billet should undergo the straightness inspection by means of visual observation. For those curved pipes or curved ends, the inspection can be carried out in use of the ruler or the rope method. The test method and its judgment are listed as follows.
a. For the full length inspection, the degree of pipe bending can not exceed 0.2% of the full length of this pipe.
b. For the end inspection, the degree of bending should not exceed
图片上文字为1—绷绳或线 1-Rope or string
2—管子 2-Tube
全长直度测量 Full Length Straightness Measurement
图片上文字为1—直尺长度大于或等于
2—管子 2-Tube
a弯曲端 a Curved end
端部直度测量 End Straightness Measurement
3.5 Length Test
The test can be carried out by means of visual observation firstly. Then, a tape measure can be used to test the long or short tube. The spot check should be no less than 10%. The measured values should be expressed in meters and accurate to one meter per cent. The length should meet the requirement of API 5CT as shown in the table. If there is the technology agreement or the special provisions of the contract, the length test should be carried out according to the technology agreement or the contract.
4. If something does not accord with the requirement of this procedure during inspection, some measures should be taken on basis of the following principles, and then the supply department should be informed.
a. If the chemical composition or the mechanical properties do not meet the demand, the merchandise can be directly returned.
b. If the appearance defect is within the prescribed limit, we can accept the degraded product. If the defect exceeds the range, we will return the goods.
c. When the diameter, wall thickness or straightness does not satisfy the requirement, we will also return the merchandise.
d. If the length can not conform to the requirement, we can make a concession to accept this product or directly return it in accordance with the actual situation.
e. When the actual weighing tonnage does not comply with the quality certificate, the store keeper must contact with the supplier for confirmation.
5. Related Records
a. Raw material incoming inspection record
b. Unqualified product treatment notice
Attached Table for the Length Range of API Oil Casing Tube
Name | R1 (m) | R2 (m) | R3 (m) | Remarks |
Casing Tube | 4.88 ~7.62 (5.49 ) | 7.62 ~10.36 (8.53 ) | 10.36 ~14.63 (10.97 ) | The numbers in brackets are the minimum allowable length. |
Tubing or the Casing Tube used as Tubing | 6.10 ~7.32 (8.53 ) | 8.53 ~9.75 (10.36 ) | 11.58 ~12.80 (13.72 ) | The numbers in brackets are the maximum consultation length. |
Short Section | Length: 0.61, 0.91, 1.22, 1.83, 2.44, 3.05, 3.66 Tolerance: ±0.076 | The length not listed in this table can be provided according to the consultation size. | ||

